You are here: CLASSE Wiki>Computing Web>GitLab (30 Jul 2021, DevinBougie)Edit Attach
GitLab
GitLab is the open-source version of GitHub. Both are web-based git repositories that come with a whole bunch of project management tools such as a web-based UI, issue trackers, task managers, and continuous integration (CI).Documentation
Local GitLab Installation - https://gitlab01.classe.cornell.edu/
A local installation of the Community Edition (CE) of GitLab is available to use by anyone with a CLASSE account. Just log in with your CLASSE credentials and you will have a profile automatically set up. You can immediately begin creating projects or contributing to other projects. https://gitlab01.classe.cornell.edu/Create a Project
If you've already used GitHub, you know how to use GitLab. If you're new to GitLab, just go create a new project and you will immediately see the basic steps you need to get started. Please see How To Create A Project for more information.Issues
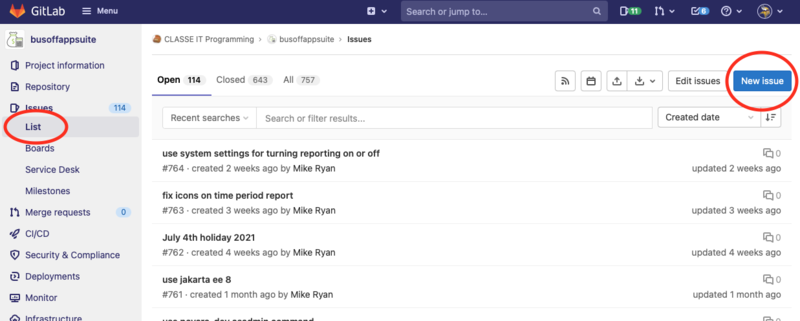
You can create issues in a project to keep track of feature requests, bug reports, or any other questions or problems you might have. GitLab Issues documentation: https://gitlab01.classe.cornell.edu/help/user/project/issues/index.md- Login to https://gitlab01.classe.cornell.edu/
- Click on your desired project
- Click the Issues tab
- Click the New Issue button
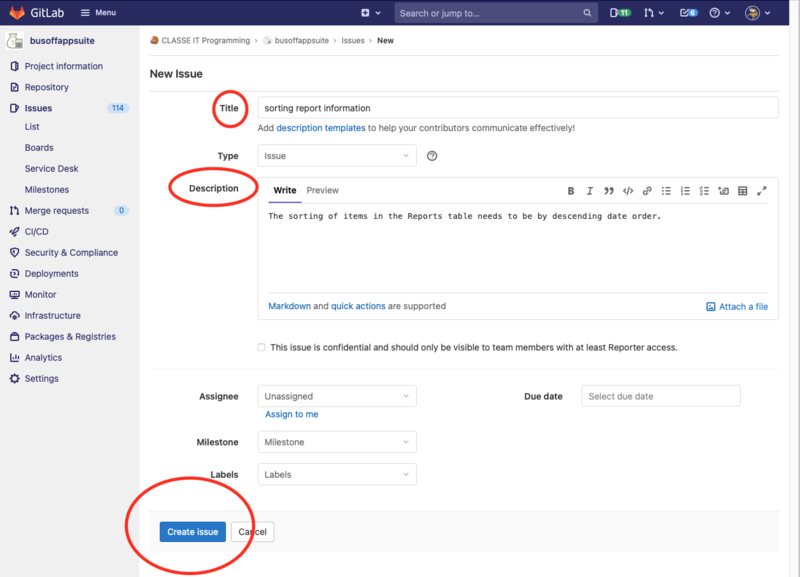
- Give the issue a title and if desired add details
- Click the Submit button


Continuous Integration (CI)
In its most basic sense, CI is an automated process of building, testing, (and if the tests pass) deploying code. If you would like to use GitLab's Continuous Integration feature, add your project to the GitLab Runner. If you do not have permissions to do so, contact CLASSE-IT and we will assist you. The project may also need permissions changed in order to use Pipelines. Within the project got to Settings -> Permissions and check that Pipelines is enabled..gitlab-ci.yml configuration file
The main thing you'll need to get CI running is a .gitlab-ci.yml configuration file committed to the root directory of your project. This file can be created right in GitLab itself. Once you create this file, GitLab will tell you if it's valid or not. Once it is, and this file has been committed the first Pipeline job should run. Example file:
stages:
  - build
  - deploy

variables:
    APP_NAME: "CHESS Inventory DB"
    DEV_HOST: "glassfish-dev"
    DEV_URL: "https://testwww.classe.cornell.edu/chess-inventory-db/"
    PROD_HOST: "glassfish"
    PROD_URL: "https://www.classe.cornell.edu/chess-inventory-db/"
    USER: "gfish"
    CI_DEBUG_TRACE: "true"

build:
    stage: build
    script:
        - env
        - ./gradlew clean build --version
        - ./gradlew war
        - "echo workspace: $PWD"
        - ls $PWD/build/libs
    artifacts:
        paths:
        - build/libs/*.war
        expire_in: 1 week

deploy_staging:
    stage: deploy
    script:
        - "echo deploying $APP_NAME to Dev environment"
        - "echo host: $DEV_HOST"
        - "echo url: $DEV_URL"
        - /nfs/classe/glassfish/bin/asadmin --user $USER --passwordfile /nfs/classe/glassfish-dev/glassfish/domains/domain1/config/.passwordfile --host $DEV_HOST deploy --force=true $PWD/build/libs/chess-inventory-db.war
    environment:
        name: staging
        url: https://testwww.classe.cornell.edu/chess-inventory-db
    only:
    - master
GitLab Project Settings
You may need to change a project's CI/CD setting in order for the build to work correctly. Working projects have the following set to "blank": From the project page: Settings -> CI/CD -> General Pipelines -> git fetch -> Git shallow cloneResources
- GitLab's Quick Start CI documenation
- Configuration of your jobs with .gitlab-ci.yml
- How to enable or disable GitLab CI/CD
- JenkinsAutomationServer - the other CI solution currently available at CLASSE
Edit | Attach | Print version | History: r6 < r5 < r4 < r3 | Backlinks | View wiki text | Edit wiki text | More topic actions
Topic revision: r6 - 30 Jul 2021, DevinBougie
Quick Links
Usage Information
Collaboration
IT Communications
 Copyright © by the contributing authors. All material on this collaboration platform is the property of the contributing authors.
 Ideas, requests, problems regarding CLASSE Wiki? Send feedback
