You are here: CLASSE Wiki>ERL Web>SimGUI>BasicUsage (11 May 2015, ErlOperator)Edit Attach
Basic Usage
Getting Started
simGUI assumes that the following are in your path- distgen - our C++ distribution generator
- gpt, gdfa, etc - If you are using GPT, its executable and all of its helper executables
- Needs to have functions for coherence length compiled into gpt
- astra - If you are using Astra, then it must be in your path
- matlab -nodesktop -r simGUI
Loading a Layout / Previous Save
If it is your first time running the GUI, it will start by loading a blank layout (later on, it will default to your previously used layout.) To load a layout, use:- File -> Select Layout Directory
- File -> Load Simulation
Changing Settings
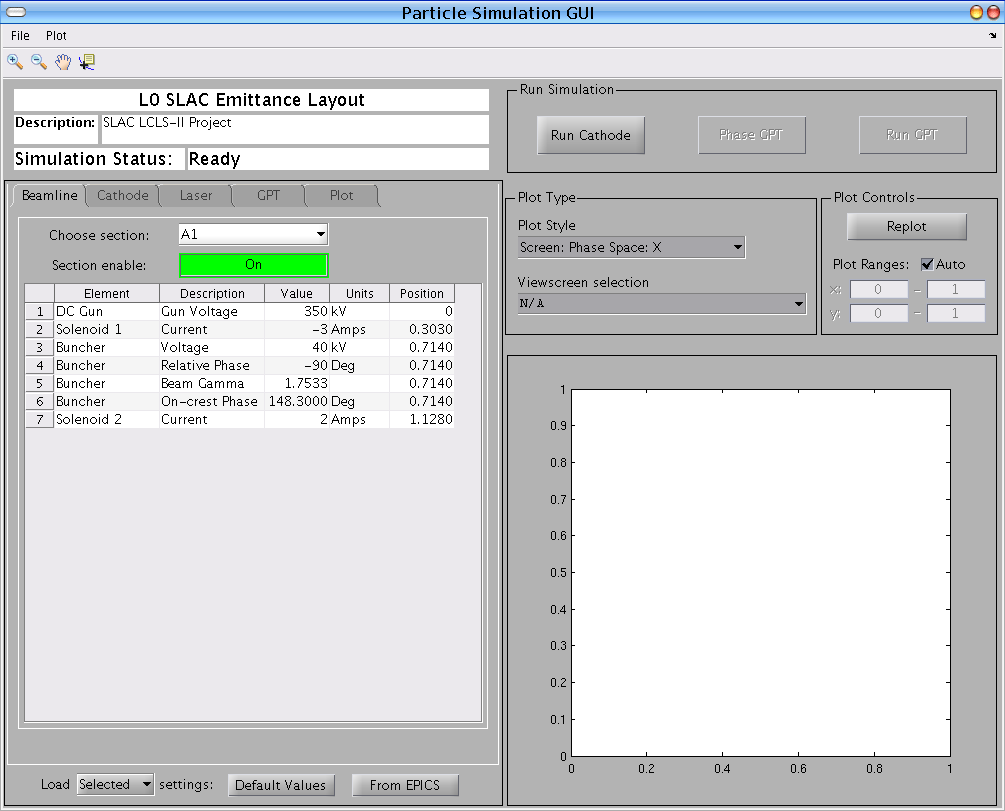
The GUI window should look something like the following example. On the left side is a list of tabs, e.g. "Beamline", "Cathode", etc. The order, names, and contents of these tabs are determined by the files inside of the layout directory that you have loaded. Clicking on a tab will show you the the various settings that you can change. Interacting with most things should be self-evident, but for the settings located in a table, only the "Value" column can be interacted with.
Running Simulations
On the upper-right area of the simGUI window are the simulation run buttons. Typically, there will be more than one step to a simulation, and the steps need to be taken in a certain order. For example, you need to hit "Run Cathode" to make a particle distribution, before you can "Run GPT". If the layout is set up properly, the order of the simulations will be enforced by greying-out the latter simulations until the earlier ones are finished. For example, "Run GPT" is greyed out until a particle distribution is made. In addition, if a setting is changed that affects one of the early simulations, it will grey-out all subsequent simulations, so that the user doesn't accidentally use stale data.Viewing the Output
On the middle right side of the GUI are two menu selectors, "Plot Style" and "Viewscreen selection". At any time, you can change the plot style, and view whatever data has been created. If a screen type of plot style is selected (has the word "screen" in the description), then the "Viewscreen selection" can be changed.- Plot -> "Make New Figure" : Clicking this will replot the current plot in a separate window. This is helpful for exporting the data, or fine-tuning the plot for presentation.
Edit | Attach | Print version | History: r2 < r1 | Backlinks | View wiki text | Edit wiki text | More topic actions
Topic revision: r2 - 11 May 2015, ErlOperator
- Webs
-
 ACC
ACC
-
 ACL
ACL
-
 Bunch
Bunch
-
 CBB
CBB
-
 NSF
NSF
-
 CBETA
CBETA
-
 CESR
CESR
-
 Private
-
 CHESS
CHESS
-
 FMB
FMB
-
 Maia
Maia
-
 XIMG
XIMG
-
 XLEAP
XLEAP
-
 CHEXS
CHEXS
-
 CLASSE
-
 Inventory
-
 CLEO
CLEO
-
 CMSPhase2MREFC
-
 Computing
-
 Blogs
Blogs
-
 Newsletter
-
 Cosmology
-
 DarkPhoton
-
 ERL
ERL
-
 EngineeringDesignDrafting
-
 G2
G2
-
 HEP
HEP
-
 DBSWorkshop
-
 SWIG
SWIG
-
 HLLHCCMSMREFC
-
 HMF
HMF
-
 HumanResources
-
 Private
-
 ILC
ILC
-
 Americas
-
 CesrTA
-
 Proposal
-
 DampingRings
-
 AreaLeaders
-
 CTA09
CTA09
-
 ILCDR06
-
 ILCDR07_KEK
-
 ILCDR08
-
 S3TaskForce
-
 WWS
WWS
-
 MacCHESS
-
 Main
Main
-
 People
-
 PhotocathodeBrightBeams
-
 REU
REU
-
 SRF
SRF
-
 Safety
-
 Sandbox
-
 TestWeb
-
 System
-
 Theory
-
 Communications
-
 Documents
-
 Phase2MREFC
-
 WebDev
-
 XLEAP
XLEAP
 Copyright © by the contributing authors. All material on this collaboration platform is the property of the contributing authors.
 Ideas, requests, problems regarding CLASSE Wiki? Send feedback
